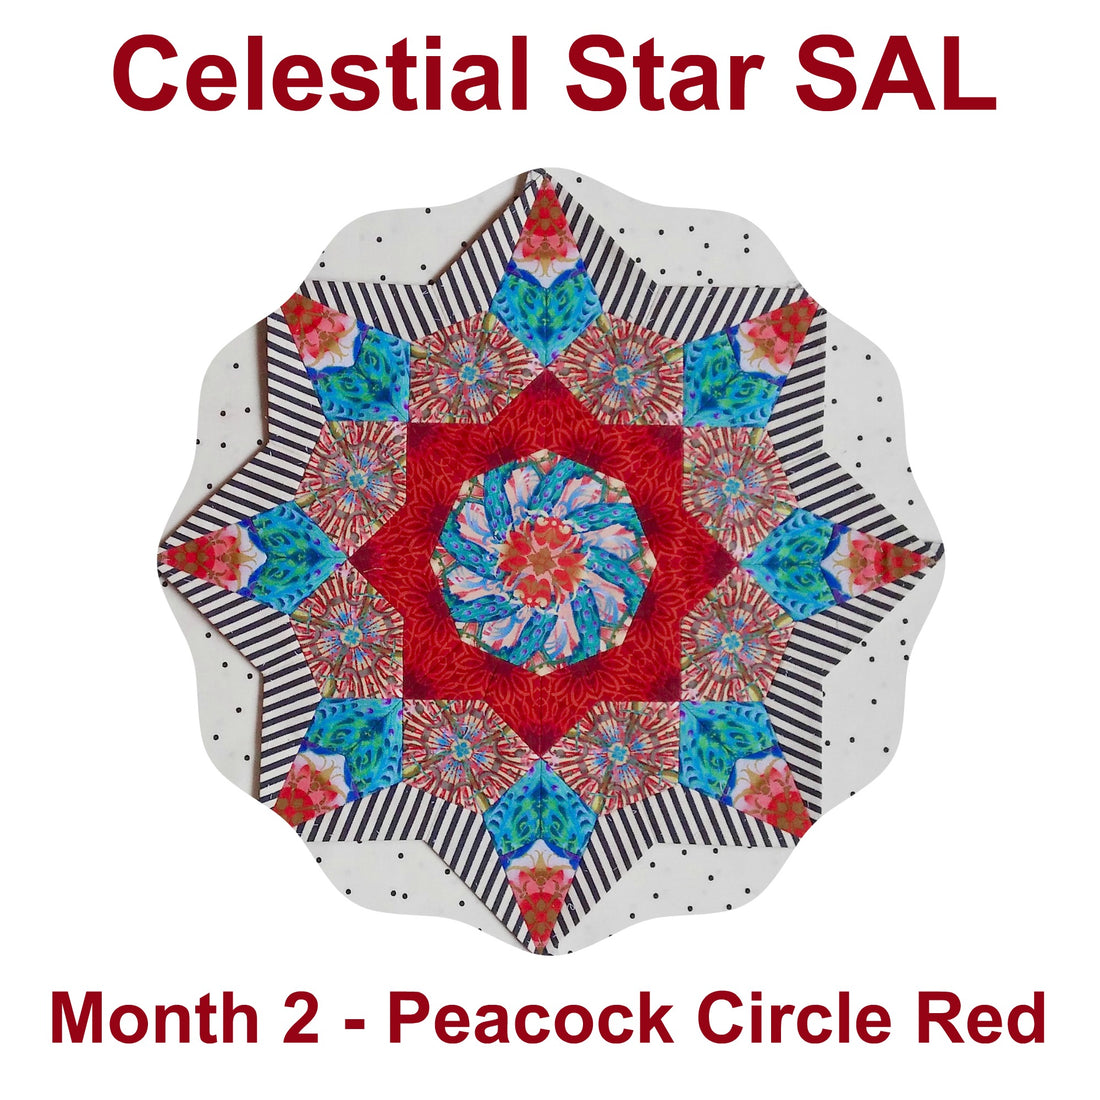
Celestial Star SAL - Month 2 - Peacock Circle Red

It's time for our February Celestial Star Color Burst. I hope you all have made some progress on January's Twin Peacocks. I'd love to see what you have accomplished. You can post on Facebook (Celestial Star Stitch-Along) or Instagram hashtag #CelestialStarSAL. And please, ask any questions, no matter how small, either on the Facebook page or you can DM me at my Instagram account at cheshire_cat_quilts.
I remember my first complex EPP project a few years ago. It was Katja Marek's Rosette/Milliefiore Quilt. I had done simple hexagon quilts and Lucy Boston blocks prior to discovering her New Hexagon book and her Rosette pattern. Her Rosettes were so exciting, different from any other English Paper Piecing project.
The first Rosette was the largest and selecting fabrics was my biggest challenge...although, I did tend to reverse or sew these unfamiliar shapes in backwards. The ripping out....ugh! In the end, not only was I thrilled with the piece, but I also had a better understanding of the process. At that time my stash did not include a great deal of fabrics for fussy cutting so I joined a BOM as many of you have here. I was guaranteed beautiful results because the design with fabrics had been worked out for me. By the third block, I was adding my own touch to the Rosettes with my own fabrics. As I constantly tend to gravitate toward new EPP designs and new fabrics to play with, I find I have numerous UFO's. But the experience I've gained from each and the growth in my fussy cutting skills makes every one of these projects worthwhile. And I believe I will finish most, if not all, of these UFO's someday. But today, I hope to help you along with your Color Bursts.
BACK TO BASICS:
Basting Papers
I baste with the long threads on the back for two reasons. First, the photographs I post are more attractive. Second, the long stitches on the back tend to hold the seam allowance in place. You want to keep your fabric taught but not pulling. You want your corners crisp and neat. ALWAYS IRON YOUR PIECE AFTER BASTING. If you are basting a long, very thin paper, such as the wings that we will begin in April, you need numerous stitches near the point. The picture below shows you the front and back of my standard basted piece. (Note that the fabric placement/cut shown here is not from this month's Color Burst.)

There are those who like to baste by taking stitches at each corner but not going through the paper. I've done all hexagon quilts this method with plastic pieces rather than papers, and they worked very well. The plastic held the fabric without bending out of shape. I would not recommend this method for fussy cutting as the fabric can shift a minute amount, enough to throw off your design.
Probably the most popular method is glue basting. You need to use a very small amount of glue on the edge of the fabric. If you punch a hole in the middle of your paper with a standard office hole punch, it will make popping out the paper easier. Insert a "purple thang" or similar stick with a dull point into the hole to remove the papers. This is definitely the fastest way to baste.
Joining Pieces
It is my opinion that the best way to keep your stitches from showing is to make the smallest stitches possible through a very small amount of fabric and to keep your stitches snug.

The picture shows stitches on a 1-1/2" seam. There are approximately 38 stitches on this seam. So many fabrics have color changes from very light to very dark. Your thread might match one of the colors or you may use a neutral thread. The smaller the stitch, the less apt the thread will not show from the front.
Below is a picture of a center block with the first ring attached. Notice how an opening has been left between two sets of four pointed stars. This opening extends back to a corner of the center octagon. I find it much easier to attach this circle with it open; when the circle is closed it is more difficult to maneuver around the octagon. After you have sewn the circle as shown in the picture, close the circle by sewing the short edges together BEFORE you join it to the octagon. This will ensure a straight connection line. (Note that the fabrics used in the illustration are not the fabrics used in this Color Burst, nor is the octagon pieced in this Color Burst.)

And, below is a picture of a deconstructed Color Burst. This picture shows the first sections to be pieced; the pairs of four pointed stars in the first round and the outside pairs of four pointed stars before the Color Burst points. NOTE that after you have basted your fabrics to your papers and pressed them, you may find slight variances in the fabric placements (hopefully no more than about 1/16th of an inch). Lay all sixteen pieces out and determine which pieces match perfectly into pairs. Remember that some pairs are mirror imaged. (Note that the fabrics used in illustration are not the fabrics used in this Color Burst.)

DETAILED INSTRUCTIONS FOR MONTH 2 - PEACOCK CIRCLE, RED.

The picture shows you Color Burst #2, which we are referring to as Peacock Circle Red. There will be another Peacock Circle Color Burst; therefore, "Red" is in the title referring to the first color round. The exact placement for cutting each motif WITH SEAM ALLOWANCE INCLUDED is outlined below. Be careful when cutting: CUT ONLY AROUND THE DESIGNATED MOTIF.
Placements have often been selected specifically for you to match design motifs, often on both sides of the piece. When basting the fabrics to the papers, pay attention to the following:
(1) Center Octogon is cut from the red Peacock Circle fabric.
IMPORTANT NOTE: CUTTING LINE HAS BEEN MARKED WITH MARKER AND FOLD LINE HAS BEEN DRAWN IN PENCIL, TO ILLUSTRATE THE POINT. DO NOT USE MARKER FOR CUTTING LINE AND DO NOT MARK YOUR FOLD LINE.

(2) Four-pointed Stars cut from the Red on Red fabric. Cut sixteen identical pieces as shown in the picture below being careful to keep both sides of one 4-pointed star identical. You will be joining sets of two matching the long side. And, you will be joining the sets matching the short side.
IMPORTANT NOTE: CUTTING LINE HAS BEEN MARKED WITH MARKER AND FOLD LINE HAS BEEN DRAWN IN PENCIL, TO ILLUSTRATE THE POINT. DO NOT USE MARKER FOR CUTTING LINE AND DO NOT MARK FOLD LINE.

(3) Celestial Star Jewel cut from red Peacock Circle fabric. The picture below shows your Celestial Star Jewel cutting diagram, centered on motif. Cut eight.
IMPORTANT NOTE: CUTTING LINE HAS BEEN MARKED WITH MARKER AND FOLD LINE HAS BEEN DRAWN IN PENCIL, TO ILLUSTRATE THE POINT. DO NOT USE MARKER FOR CUTTING LINE AND DO NOT MARK FOLD LINE.

(4) Four-pointed Stars cut from the Twin Peacock fabric. There are a total of 16 pieces cut, 8 from the left facing peacock and 8 from the right facing peacock. These pieces are mirror imaged. Your cutting illustration is shown below, as well as a pieced pair showing how the mirror-imaging gives a secondary design within itself. Notice the face of maybe a tiger or a scary movie villain.
IMPORTANT NOTE: CUTTING LINE HAS BEEN MARKED WITH MARKER AND FOLD LINE HAS BEEN DRAWN IN PENCIL, TO ILLUSTRATE THE POINT. DO NOT USE MARKER FOR CUTTING LINE AND DO NOT MARK FOLD LINE.


(5) Kite cut from Twin Peacock fabric. Notice how the birds head is cut off at the FOLD LINE. This will cause the blue curves of the birds body to flow into the top edge of the blue four-pointed star set. It is one way fussing cutting can create unexpected results, causing the blue pieces to look as though they have a curved edge. I always enjoy finding such surprises within a piece of fabric. Using your fussy cutting viewers you can find all kinds of ideas in a piece of fabric suited for fussy cutting. Cut eight.
IMPORTANT NOTE: CUTTING LINE HAS BEEN MARKED WITH MARKER AND FOLD LINE HAS BEEN DRAWN IN PENCIL, TO ILLUSTRATE THE POINT. DO NOT USE MARKER FOR CUTTING LINE AND DO NOT MARK FOLD LINE.

FINALLY, I hope you enjoy making Celestial Star Color Burst #2. This was the first Color Burst I made when I started this quilt, and I was thrilled with the collection of fabrics, Jason Yenter's Treasures of Nature, chosen for the project. I love every one of my Color Bursts. I hope you do, as well.
HAPPY VALENTINE's DAY💝
