Celestial Star SAL - Month 3 - Twin Seahorses

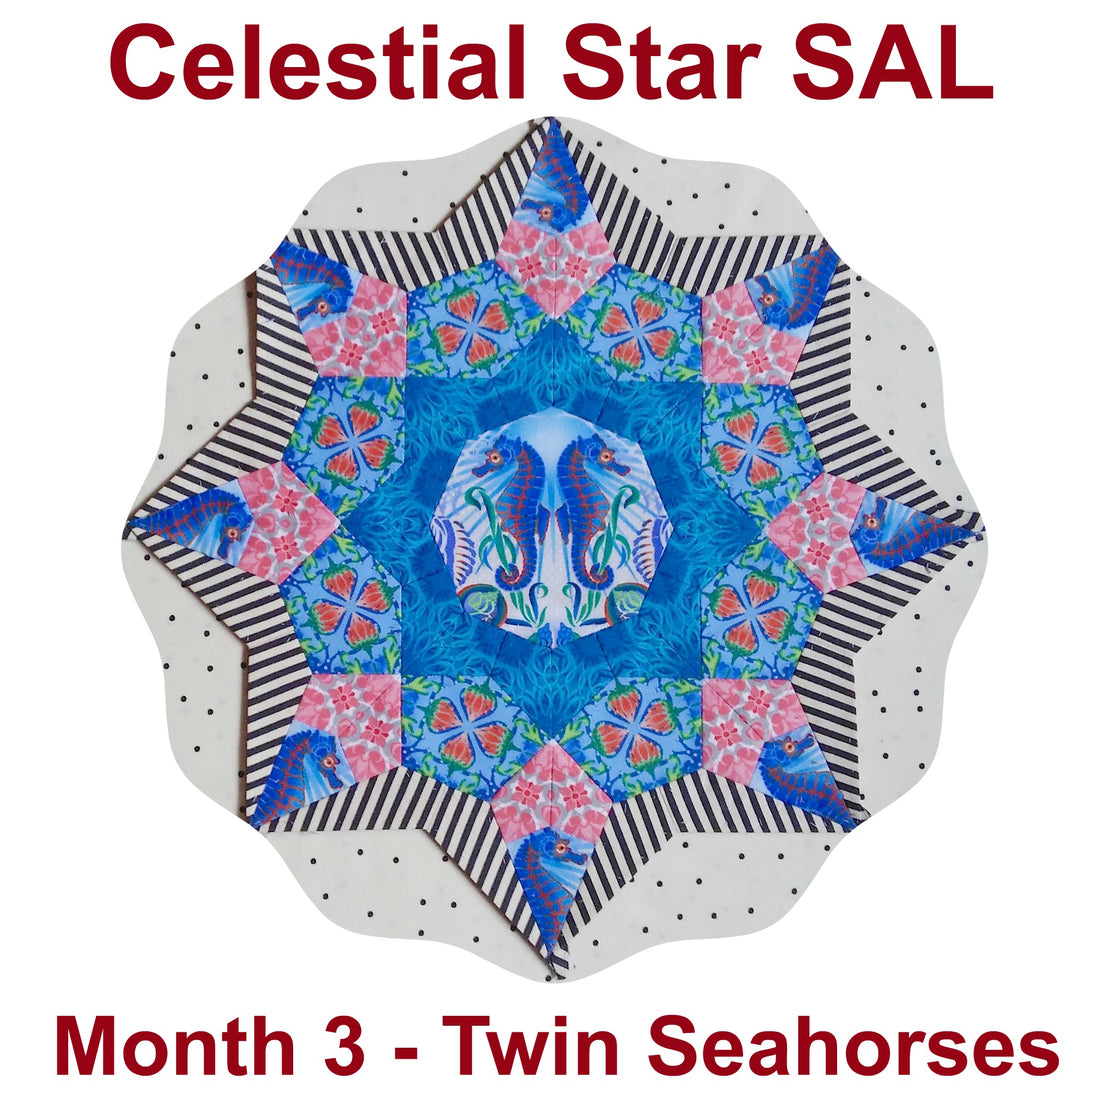
It's March already; Spring is trying to come alive here. I hope your Color Bursts are coming alive as well. Our third Color Burst is "Twin Seahorses." Jason Yenter has once again captivated me with his Treasures of Nature fabric print artistically depicting seahorses, seashells and mermaids. Hmmm, a mermaid is a Treasure of Nature? And as so many of his fabrics do, this piece lends itself beautifully to fussy cutting.
The English paper piecing method of creating quilts has been around for a long time. Antique quilts are found where they actually did cut shapes out of paper, often leaving the paper inside since paper is a great insulator. We are fortunate to have precut shapes of card stock. There are so many talented designers creating different patterns with different shapes and enough ideas to keep one very busy. I consider Katja Marek and her book, the New Hexagon along with her Rosette pattern, the catalyst of today's EPP revolution. I recently read an article about Katja, which brings me to our first tip for this month.
TIPS:
- "My only real rule is don't cut the tails off." (Quote by Katja Marek, AQS magazine.) The tails are the seam allowance, adding stability to the quilt. A shortened tail can fray and pull apart with a good tug.
- Last month, I explained my method of basting the fabric to the papers with needle and thread. Sharon Burgess, the designer of our Celestial Star quilt, shared this information about gluing the fabric to the papers. "Your papers can be reused many times, especially the ones cut by my wholesaler Creative Abundance (these are the ones provided in the Red Thread Studio Fabric/EPP packs). I only throw mine out if I accidentally tear them when removing the papers. I highly recommend the Sewline Glue pen and refills. These pens are nice and thin and when used correctly you do not put too much glue on. Always glue the paper, not the fabric (gluing the fabric will use more glue). Hold your glue pen like a pen, on an angle so you are only applying glue from the edge of the glue stick. Also, remember less is more with your glue, and this will come with time. If you have trouble removing your papers you are using too much glue. Never use regular/kids glue sticks. They are too thick and you will get too much glue on your papers." (Used with permission. Thank you Sharon.)
- Use Clover Wonder Clips to hold your basted pieces together. I like to clip the pieces at the end. Sometimes it happens that the two pieces are different lengths. Using the clip at the end will help to ease the two pieces together. Have you noticed how many ways Clover Clips can be used? After basting a matching group of eight papers, I clip them together. I organize my Star Bursts in baggies, clipping the top so the pieces don't fall out. I have clipped sticky notes to my shirt so that I remember something. I keep a clip on page 56 of our book "Quilting on the Go, English Paper Piecing" by Sharon Burgess, where her instructions begin. I am sure there are many imaginative household uses for these clips.
- When basting fabrics to the papers, always fold the fabric toward you. I am guilty of not adhering to this rule at all times. I do, however, remember to properly fold the fabric when covering pointed pieces which will be sewn together at the point. Later in this quilt, you will be sewing eight and sewing nine points together and with all uniform folds, your points will sew together easily and lay flat.
- When tracing your shapes onto the fabric, try to utilize your fabric in the most efficient way. Most of these prints have approximately a nine-inch repeat and there are usually six repeats across the width. In many large motifs, we have the opportunity to cut numerous pieces. Whenever possible, cut different pieces from a large motif area already used, rather than cutting in new areas of the fabric. In the tone on tone fabric such as the Blue in the photo below, squeeze your cuts together, cutting one upside down and the next right side up, etc.

DETAILED INSTRUCTIONS FOR MONTH 3 - TWIN SEAHORSES:

The exact placement for cutting each motif WITH SEAM ALLOWANCE INCLUDED, is outlined below. Be careful when cutting: CUT ONLY AROUND THE DESIGNATED MOTIF.
Placements have often been selected specifically for you to match motifs, often on both sides of the piece. When cutting and then basting fabrics to the papers, pay attention to the following:
(1) Center Octagon is cut from the Twin Seahorses fabric. The octagon is placed tip to tip vertically. Although centered horizontally, the seahorses are not centered vertically. Take a look at where the cutting line hits the fabric at the bottom. Allow me an OOPS moment as I notice my picture below is not quite lined up on both sides at the bottom. However, the picture of the finished Color Burst is correct.
IMPORTANT NOTE: CUTTING LINE HAS BEEN MARKED WITH MARKER AND FOLD LINE HAS BEEN DRAWN IN PENCIL, TO ILLUSTRATE THE POINT. DO NOT USE MARKER FOR CUTTING LINE AND DO NOT MARK YOUR FOLD LINE.

(2) Four-pointed Stars cut from the Blue on Blue fabric. Cut sixteen identical pieces as shown in the picture below being careful to keep both sides of one four-pointed star identical. Notice how the top cutting line is just above the dark square motif. You will be joining sets of two matching the long side. And, you will be joining the sets matching the short side.
IMPORTANT NOTE: CUTTING LINE HAS BEEN MARKED WITH MARKER AND FOLD LINE HAS BEEN DRAWN IN PENCIL, TO ILLUSTRATE THE POINT. DO NOT USE MARKER FOR CUTTING LINE AND DO NOT MARK YOUR FOLD LINE.

(3) Celestial Star Jewel cut from the Blue Medallion fabric. The picture shows your Celestial Star Jewel cutting diagram, not quite centered on motif. Take note of where the bottom fold line point hits on the fabric. Cut eight.
IMPORTANT NOTE: CUTTING LINE HAS BEEN MARKED WITH MARKER AND FOLD LINE HAS BEEN DRAWN IN PENCIL, TO ILLUSTRATE THE POINT. DO NOT USE MARKER FOR CUTTING LINE AND DO NOT MARK YOUR FOLD LINE.

(4) Four-pointed Stars cut from Pink Medallion fabric. The circle in the fabric is not symmetrical; be sure to utilize the correct direction. Notice how the fold line points hit the white motif top and bottom. Cut sixteen identical pieces as shown in the picture below being careful to keep both sides of one four-pointed star identical. You will be joining sets of two matching the long side.
IMPORTANT NOTE: CUTTING LINE HAS BEEN MARKED WITH MARKER AND FOLD LINE HAS BEEN DRAWN IN PENCIL, TO ILLUSTRATE THE POINT. DO NOT USE MARKER FOR CUTTING LINE AND DO NOT MARK YOUR FOLD LINE.

(5) Kites cut from Twin Seahorse fabric. Notice how the seahorse's crown is touching the fold; also notice where the bottom point hits on his vertebrae. The reason for this placement is to utilize, as much as possible, the dark color of the body in the outside point of the Color Burst. Star points will not be effective if they fade into the background; you want a star point to be bold and to stand out. This will also be important when making Star Bursts. Cut eight.
IMPORTANT NOTE: CUTTING LINE HAS BEEN MARKED WITH MARKER AND FOLD LINE HAS BEEN DRAWN IN PENCIL, TO ILLUSTRATE THE POINT. DO NOT USE MARKER FOR CUTTING LINE AND DO NOT MARK YOUR FOLD LINE.

FINALLY, I hope that you enjoy making your Celestial Star Color Bursts. Next month we will be covering the addition of wings. They are tricky little buggers, and they will later be part of a nine piece intersection; therefore, perfection is important. You will then be able to go back and add the wings to Color Bursts #1-3, and add them to all future Color Bursts as we proceed.
Please post your progress weekly on Facebook at Celestial Star Stitch Along and on Instagram at #CelestialStarSAL. We would love to see your progress and you could win some really nice prizes from Red Thread Studio.
1 comment
Thank you for your precise and understandable descriptions. This is such a pretty block. I’m sure we will be glad to have followed your quidance when it comes to putting all the blocks together. This SAL remains a very enjoyable monthly exercise that I’ve come to look forward to.