Celestial Star SAL - Month 4 - Seashells

Happy Spring!
My big news is that I finished my Celestial Star quilt top and sent it to Jen at Red Thread Studio in Florida. She will have it quilted, and for those of you going to Paducah this month, it will be hanging in her booth (4114/4215 in the Pavilion). Seeing a quilt in person is so much more exciting than in a picture.

This quilt was six months in the making. I never get tired of creating new fussy cuts, so this was a fun project for me. I will continue to guide you through my techniques; but remember, this is the way I made it, and you may have other techniques that you prefer.
This month we are making the Seashell Color Burst. First, some notes about the wings.
WINGS (I like the suicide hot wings the best.)

It is time to start adding wings. You will need to go back and add them to your January, February and March Color Bursts. Beginning with April and through September, you will be adding the wings as you complete each Color Burst. There are also wings in the four corners.
The left and right wing are reverse images. Therefore, I drew one window template with two sides, indicating the seam, the bottom, the left or right. These are on opposite sides of the same piece of cardstock; this helped me keep from mixing up two templates.

Be sure you sew your wings together correctly, otherwise they will not fit.

Be sure your center seam lines on each, right and left, are in the middle of a white stripe. If a white stripe is slightly wider or thinner than the others, it is less likely to be noticed.

Cut your seam allowance at 1/4" WITH THE FOLLOWING EXCEPTION. I added a little more length to the point so I would have a bit more fabric at the crucial seam joining other points. Be conservative with your fabric keeping all the left wings lined up on one side of the fabric and all the right wings lined up in another area. I kept my window template handy until I could look at a wing and immediately recognize it as left or right.

It is important to have VERY TIGHT points to complete the intersections. When I basted my pieces, I started making very small basting stitches about 1-1/2" from the thin point. Although I have not tried it, glue basting might be a good way to go with these points because, even with very small basting stitches, the fabric would pull when sewing together multiple points. Although we will not be sewing together multiple points this month, I wanted you to see why it is important to keep your point very tight. These pictures show some of my good intersections. Some of mine were not so perfect. In fact, on one I had to rip each seam back two inches. In the following pictures you will see samples of either 5, 9, or 10 points coming together.

You will first sew a pair of wings together at the short seam.

Then attach them to the Color Burst ONLY at the base. This will keep them in place as you sew the wing tips to the points of the Color Burst.

When sewing the points, line them up at the tip. You want the very top tip of the wing to match the very top tip of the Color Burst. Because the are different sizes and approach each other differently, you will want to peek underneath the tip where you are starting to sew to make sure they are tip to tip.

Once you have secured your tip, put a Clover Clip at the base of the wing to make sue it stays in line. Then you will sew back to the base.

The most important part is to have your tips matching.

I started sewing my wings to the Color Burst at the base of the wing only. I would stitch all eight wing sets to the Color Burst across the base before I pursued the wing tips. This made the process easier and lined up the bottom of each wing evenly. I like to start sewing the remaining section of the piece at the point with the wing on top. This way I was able to slightly lift and see that the points were coming together exactly where I wanted. After you have made about eight VERY SMALL STITCHES, unfold the points to check that they didn't shift out of place. Put a Clover Clip at the opposite end. If it appears that one piece slightly buckles and you have properly matched up your points, this small bump will work itself away as you sew when you bend your pieces gently away from the buckle.
DETAILED INSTRUCTIONS FOR MONTH 4 - SEASHELLS:
The exact placement for cutting each motif WITH SEAM ALLOWANCE INCLUDED, is outlined below. Be careful when cutting: CUT ONLY AROUND THE DESIGNATED MOTIF.
Placements have often been selected specifically for you to match motifs, often on both sides of the piece. When cutting and then basting fabrics to the papers, pay attention to the following:
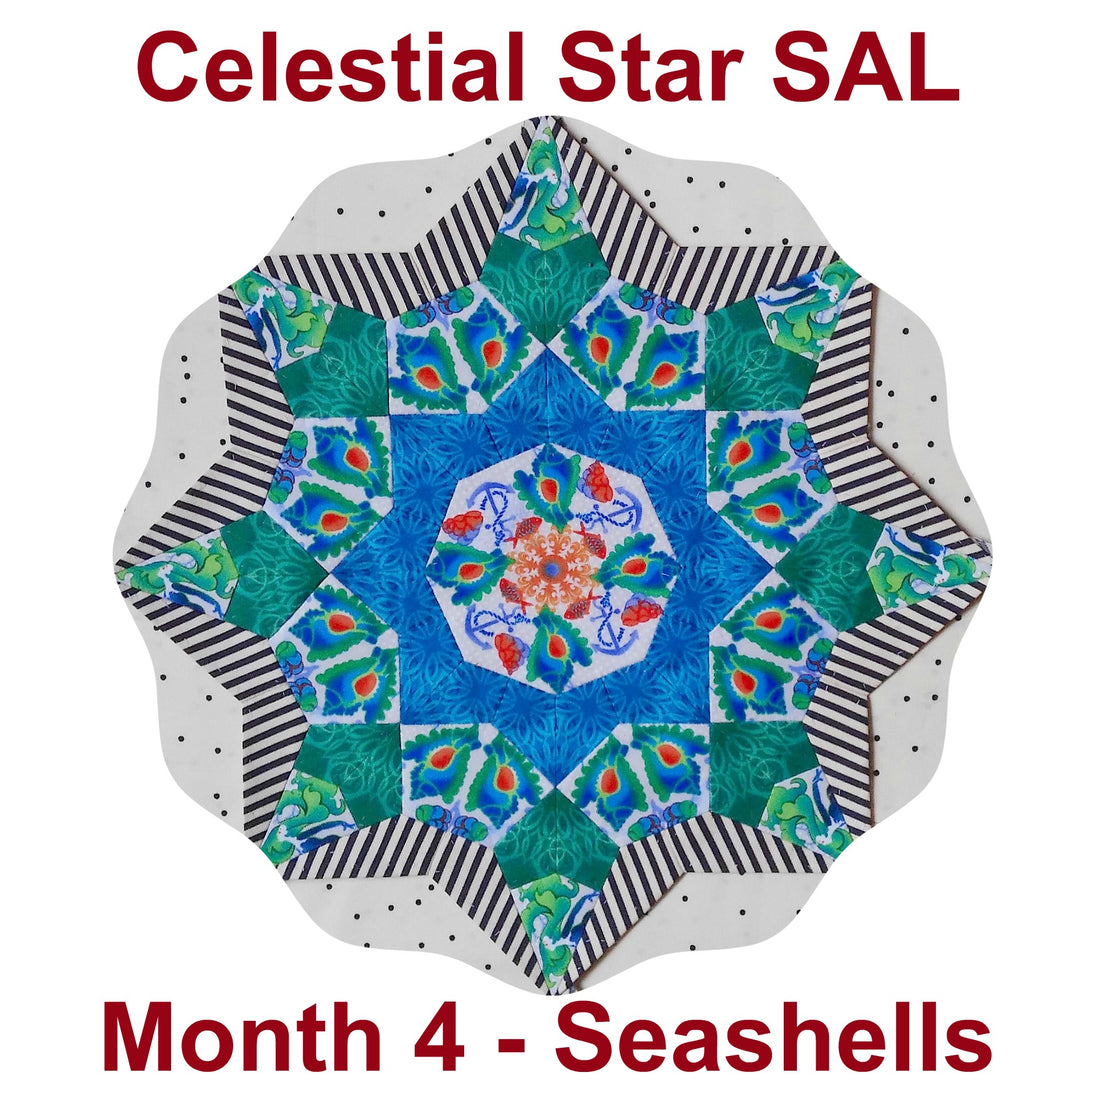
(1) The Octagon Centerpiece is cut from the Seahorse Circle fabric. Notice that the outside points of the seashells touch the octagon at four outside points. Cut one.
IMPORTANT NOTE: CUTTING LINE HAS BEEN MARKED WITH MARKER AND FOLD LINE HAS BEEN DRAWN IN PENCIL, TO ILLUSTRATE THE POINT. DO NOT USE MARKER FOR CUTTING LINE AND DO NOT MARK YOUR FOLD LINE.

(2) The Four-Pointed Star round are cut from the Blue on Blue fabric. The flower-like motif is centered at the widest point. Cut 16. Join them in sets of two matching the long sides. Then join each set matching the short side. Leave one side open until after you have joined the ring of blue to the center.
IMPORTANT NOTE: CUTTING LINE HAS BEEN MARKED WITH MARKER AND FOLD LINE HAS BEEN DRAWN IN PENCIL, TO ILLUSTRATE THE POINT. DO NOT USE MARKER FOR CUTTING LINE AND DO NOT MARK YOUR FOLD LINE.

(3) The Modified Jewels are cut from the Twin Seahorse fabric. The two seashells fit perfectly into this piece. The small motif above the pair of seashells is cut nearly in half. Cut 8.
IMPORTANT NOTE: CUTTING LINE HAS BEEN MARKED WITH MARKER AND FOLD LINE HAS BEEN DRAWN IN PENCIL, TO ILLUSTRATE THE POINT. DO NOT USE MARKER FOR CUTTING LINE AND DO NOT MARK YOUR FOLD LINE.

(4) The Four-Pointed Star sets are cut from the Green on Green fabric. Notice that the square-like motif is at the wide point. Cut 16. Join in sets of two on the long side.
IMPORTANT NOTE: CUTTING LINE HAS BEEN MARKED WITH MARKER AND FOLD LINE HAS BEEN DRAWN IN PENCIL, TO ILLUSTRATE THE POINT. DO NOT USE MARKER FOR CUTTING LINE AND DO NOT MARK YOUR FOLD LINE.

(5) The kite is cut from the Twin Seahorse fabric, I love using the mermaids. A mermaid is a Sirene, whose myth is generally associated with causing shipwrecks. Quite different from the little mermaid stories of our generation. Notice how the hand on her left arm points into the corner. Be sure not to get any orange fish over the fold line; however, there is some cut within the seam. Some of her hair is cut off, and her chest leans onto a fold. For the remaining pieces, I usually lay my first cut piece onto the fabric and mark points before I draw the entire piece. Cut 8.
IMPORTANT NOTE: CUTTING LINE HAS BEEN MARKED WITH MARKER AND FOLD LINE HAS BEEN DRAWN IN PENCIL, TO ILLUSTRATE THE POINT. DO NOT USE MARKER FOR CUTTING LINE AND DO NOT MARK YOUR FOLD LINE.

Well, that's it for today. Remember to KEEP POSTING or START POSTING your progress and use #CelestialStarSAL. Did you see the thread package that Janet won in the last drawing? A very generous prize. This Superior thread is the best thread I have ever found for EPP, and I used approximately four bobbins for this entire quilt.
Smiles......Carolyn
2 comments
This is wing cutting day for me. Taking your advice to “be conservative with your fabric” Carolyn, I found that I can get at least 35 half wings across the width of fabric. Each piece shares a long side with the next. Without turning the template over I swivel it so that the point alternately is up, then down. I plan to do the same lineup for the opposite half, cutting from the length of fabric. Now to figure out just how many are needed for the entire project! Cheers!
Thank you Carolyn! I so appreciate your experience and precise directions!!! Away we go. Taking wing!