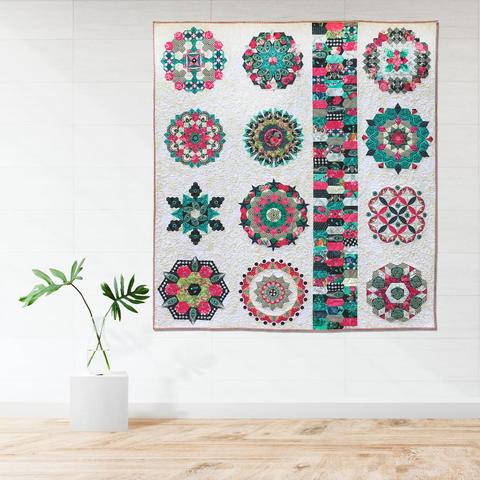
Decadence Stitch-along - Month 13 - Putting It All Together

Today is my last post for our Decadence quilt. I hope all of you are working diligently to finish yours. I've enjoyed sharing with you the way I approached making this quilt. There is always more than one way to do things, and this is mine. I will be giving you two different ways of piecing the EPP column together. The first is standard EPP. The second is included as an Alternative Method using machine stitching and EPP, which will greatly speed up the piecing of this column.
(1) With the design exactly centered on your fabric, trim the twelve blocks to 17-1/2 inches squared.
2) Arrange your blocks in a pleasing manner into three columns of four blocks. Feel free to experiment and arrange them differently than my original quilt.
(3) Sew 1/4" seams horizontally, creating a column of four. Make three columns.
(4) Sew a 1/4" seam vertically, joining the two left columns together.
(5) In this month's mailing, you have received an acrylic tracing template and paper pieces of Elongated/Irregular Honeycombs. Using your acrylic template, prepare approximately 120 EPP shapes for the pieced columns of Elongated/Irregular Honeycombs. You can trace and cut your pieces from your choice of remaining fabric. One choice is to fussy cut them. A second way is to use your remaining fabric and scraps to randomly cut the pieces. Or you can mix up the two methods. In any case, you may end up with some bias pieces. **SEE BELOW FOR ALTERNATIVE METHOD**
(6) Using your favorite technique of English Paper Piecing, sew a vertical column of approximately 39 pieces together. Repeat for two more columns. **SEE BELOW FOR ALTERNATIVE METHOD**
(7) Again, using your favorite technique of English Paper Piecing, sew the three columns together. **SEE BELOW FOR ALTERNATIVE METHOD**
(8) Remove papers and press your column. Be careful not to stretch it out of shape.
(9) Trim the two vertical sides of your English Paper Pieced unit as shown in the picture below. Be sure not to trim into the stitching.


(11) Pin and sew your EPP column to the unit of two columns of blocks.
(12) Pin and sew the column of four blocks to the other side of the EPP column, making sure the horizontal seam lines of the blocks line up with the horizontal seam lines of the previously added two column unit of blocks. This will keep your quilt from being wonky.
(13) Make your quilt sandwich of top, batting and back and QUILT AWAY.
(14) Prepare and add your binding.
** ALTERNATIVE METHOD (MACHINE PIECING AND EPP) FOR PIECING TOGETHER THE ELONGATED/IRREGULAR HONEYCOMBS**
For those of you who would like to speed up the process of stitching the Elongated/Irregular Honeycombs, the following directions will explain how I finished mine for the inset column. You will be able to machine stitch the long sides of each Elongated/Irregular Honeycomb to create three very long columns, but you will still need to hand stitch the three columns together along the short sides. You will still be using the EPP papers. This process saved me a lot of time in order to make my deadline.
(1) Trace and cut your Elongated/Irregular Honeycomb using your acrylic template for tracing.

(2) Place some glue in the center of your paper piece securing it in place.

(3) With your paper shape secured to the wrong side of your cut piece. lightly draw a pencil line around it. Mark a dot at the four corners. I do not recommend using anything other than a thin pencil line.


(4) Glue your seams to the paper piece. Keep the amount of glue you use light. I highly recommend using a Sewline glue pen or another pen made specifically for EPP.
Lightly FINGER PRESS your seams. Do NOT iron them.

(5) Using two prepared pieces you wish to sew together, gently pull the fabric back from the paper on one long side seam and the two corners surrounding it on both pieces. Line them up and pin together both pieces at dots.
Sew this long seam at the sewing machine from one dot at a corner to the other dot at a corner. Be sure to get a good backstitch at each end. If you happen to catch just the slightest edge of your paper with your sewing, that is okay.

(6) Glue your seams back in place. This picture is what you will end up with.

(7) Continue to add honeycombs in the same manner. Do not iron them until you have completed an entire column. Make three columns the length of your quilt.

(8) Continue with 9 through 14 in standard instructions above.
Thank you for joining me on this journey. I hope you create a quilt you will enjoy for years. Feel free to ask any questions today or in the following months. Stay Well.
EDITOR'S NOTE: There was an error in the deadline for the Grand Prize shared in the Decadence Thank You Letter. It should have read May not April as follows:
In the meantime, post a photo of your finished quilt top between 12:01am 1 May 2020 – 11:59pm 31 May 2020 in your time zone on Instagram or Facebook using the hashtag #DecadenceSAL for a chance to win a $100 Red Thread Studio gift certificate. (Your quilt top can be quilted, but it’s not a requirement for prize eligibility.)