Decadence Stitch-Along - Month 2 - Red Star With Striped Borders - Block 11

Welcome to the second month of our new and exciting adventure in the Decadence SAL presented by Red Thread Studio. Here it is, the 15th of April, and I hope you are ready to start your second Round. Remember to share your progress on Instagram and/or Facebook using #DecadenceSAL. If you are using our Decadence fabrics OR your own fabrics OR whichever Round you are currently working on, we would love to see it. You can post your progress and/or finished Round.
The placement of fabrics in this block is very obvious, so many of you who received your fabric the first of the month may already be sewing it together. Nonetheless, I will be reviewing each fabric cut below. Remember my directions will be referring to Helen Stubbings’ iron on method (See my March blog post if you need to review Helen's video).
TIPS FOR TODAY:
- When you are stitching together your pieces, be sure to pick up only a couple threads from each piece. When you use traditional EPP papers, you can easily feel when your needle hits the paper. With the iron-on interface, it is easy to stitch into it, which you do not want to do. When you flatten out the pieces you stitched together, you do not want to feel a lump where you stitched. Both pieces should lie perfectly flat at the seam.
- Avoid using too much steam from your iron. Turn off your steam or use a very minimal amount of it when working with this interface.
IMPORTANT NOTE: Some of you may have a pattern where the templates shown on page 3 are labeled incorrectly. They should ALL be 1-1/2" templates (not 1"), as follows:
- The one-third Hexagon is measured on the long 1-1/2" edge, indicating that when three of them are put together, they form a 1-1/2" Hexagon.
- The Hexagon Kite is 1/6 of a hexagon. The 3/4" outside edge of the Kite when placed with another identical Kite creates one side of a 1-1/2" Hexagon. Therefore, it is considered a 1-1/2" Hexagon Kite.
- The sides of your Diamond and Triangle all measure 1-1/2 inches.
So, let's get started!
FABRICS USED IN THIS MONTH'S ROUND ARE:
- Black with Large Floral
- Black and White Stripe
- Peacock Feathers
- Twin Peacocks on Black
- Cream with Drawn Flowers
- Background Fabric

FABRIC CHOICES AND FUSSY CUTS:
1) The center is a 1-1/2" Hexagon compiled of six 1-1/2" Hexagon Kites. Three of these 1/6 Hexie Kites are cut from the Twin Peacocks on Black Fabric and three of these 1/6 Hexie Kites are cut from the Peacock Feathers fabric.
For each of the two fabrics, the first picture below shows a piece of the fabric where the cut comes from. The second picture below shows the finished size of the fussy cut Hexie Kite without seam allowance.
YOU WILL NEED TO LOCATE THIS SPOT ON THE BACK OF THE FABRIC.
YOU WILL IRON THE INTERFACE TO THIS SPOT ON THE BACK OF THE FABRIC.
YOU WILL CUT WITH A SEAM ALLOWANCE APPROXIMATELY 1/4" BEYOND THE INTERFACE.
Twin Peacocks fabric (CUT THREE for a Hexagon):


Peacock Feathers fabric (CUT THREE for a Hexagon):


Now, sew together THREE pieces to create a Half Hexagon (two of one fabric alternating with one of the other fabric). Repeat with the three remaining pieces. It will be easier to get a matching center this way. I like to start sewing the two halves at the center out to the edge to ensure my centers will come together at a perfect point.

NOTE: AFTER THE FOLLOWING SECTIONS #2 AND #3, SECTION #4 WILL REQUIRE THAT YOU MAKE SIX MORE HEXAGONS EXACTLY THE SAME AS ABOVE.
2) Surrounding the center are six 1-1/2" Hexagon thirds cut from the Cream with Drawn Flowers fabric. You may cut these from your fabric wherever you chose. Although each cut is not identical, I tried to cut mine with lines going outward so that they appear uniform.
The first picture below shows a piece of the fabric where the cut comes from. The second picture below shows the finished size of the one-third Hexie cut without seam allowance. CUT SIX.


YOU WILL NEED TO LOCATE THIS SPOT ON THE BACK OF THE FABRIC.
YOU WILL IRON THE INTERFACE TO THIS SPOT ON THE BACK OF THE FABRIC.
YOU WILL CUT WITH A SEAM ALLOWANCE APPROXIMATELY 1/4" BEYOND THE INTERFACE.
Sew them together along the short sides with the point going outward, leaving one seam open. Then sew this around the center Hexagon. Finally sew the final open side seam together. This is my preferred way, finding it easier to sew completely around a center section.
3) The next section, shaded grey in the page 2 illustration of the pattern, is comprised of 1-1/2" one-third Hexagons and 1-1/2" Triangles, all cut from the red flowers in the Black with Large Floral fabric. As you can see in the finished Round, the only fussy cutting is that you cut from any area of dark red flowers. Try to squeeze as many cuts as possible from a dark red flower section, so that your two yards will have enough areas to cut from for the rest of the quilt.
The first picture below shows only one area of the fabric where the cut comes from.

The second picture below shows the finished size of the one-third Hexie cut without seam allowance. CUT TWELVE.

The third picture below shows the finished size of the Triangle cut without seam allowance. CUT SIX.

YOU WILL NEED TO LOCATE THIS SPOT ON THE BACK OF THE FABRIC.
YOU WILL IRON THE INTERFACE TO THIS SPOT ON THE BACK OF THE FABRIC.
YOU WILL CUT WITH A SEAM ALLOWANCE APPROXIMATELY 1/4" BEYOND THE INTERFACE.
Refer to the illustration on page 2 of the pattern and sew two one-third Hexagons together along one side of the point, then sew the Triangle to the flat edge of the joined pieces. Make six of these sets and sew them together with the Triangles pointing outward. Then sew them around part 2 above. Once again, I prefer to sew all six sections together leaving one seam open before attaching them to the center piece.
4) Make SIX sections exactly like the center Hexagon in Section #1 above. DO NOT yet sew them to Sections #1 through #3 above. They will be joined to Sections #5 and #6 before you sew them around your red star.
5) Next, you will be making 1-1/2" Diamonds from the Cream with Drawn Flowers fabric. I cut these randomly from the fabric. CUT TWELVE. Below is a picture of the finished size of the diamond without seam allowance.

YOU WILL NEED TO LOCATE THIS SPOT ON THE BACK OF THE FABRIC.
YOU WILL IRON THE INTERFACE TO THIS SPOT ON THE BACK OF THE FABRIC.
YOU WILL CUT WITH A SEAM ALLOWANCE APPROXIMATELY 1/4" BEYOND THE INTERFACE.
DO NOT sew these to any other Section yet.
6) Now, you will be making the Triangle piece in red which sets between the two white Diamonds. This Triangle is identical to the red Triangle in Section #3 above. You need to CUT SIX 1-1/2" Triangles from the dark red section of the Black with Large Floral fabric, using the directions in Section #3 above. Below is a picture of the finished size of the triangle without seam allowance.
YOU WILL NEED TO LOCATE THIS SPOT ON THE BACK OF THE FABRIC.
YOU WILL IRON THE INTERFACE TO THIS SPOT ON THE BACK OF THE FABRIC.
YOU WILL CUT WITH A SEAM ALLOWANCE APPROXIMATELY 1/4" BEYOND THE INTERFACE.
DO NOT sew these to any other Section yet.
7) Finally, you will CUT TWELVE 1-1/2" Diamonds from the Black and White Stripe fabric. Center a black line down the length of the Diamond. Below is a picture of the finished size of the diamond without seam allowance.

YOU WILL NEED TO LOCATE THIS SPOT ON THE BACK OF THE FABRIC.
YOU WILL IRON THE INTERFACE TO THIS SPOT ON THE BACK OF THE FABRIC.
YOU WILL CUT WITH A SEAM ALLOWANCE APPROXIMATELY 1/4" BEYOND THE INTERFACE.
In the following section we will be joining Sections #4, #5, #6, and #7 together.
8) The following illustration shows how I broke down the pattern to make it easier to sew together. Notice the dark lines separating the sections. Three sections include Sections #4, #5, #6, and #7 sewn together. The other three sections include Section #4, #5, and #7 sewn together. Once I finished these, I first connected the smaller sections (which include Sections #4, #5, and #7) to the center red star. This smaller section does not include the red triangles.
Finally I connected the larger sections (which includes Sections #4, #5, #6, and #7).

By sewing it together in sections this way, you are handling less bulk, and it is easier to line the pieces up.
Lastly, appliqué your completed Round to the center of an18 inch square of background fabric. The square will later be trimmed to 17-1/2 inches.
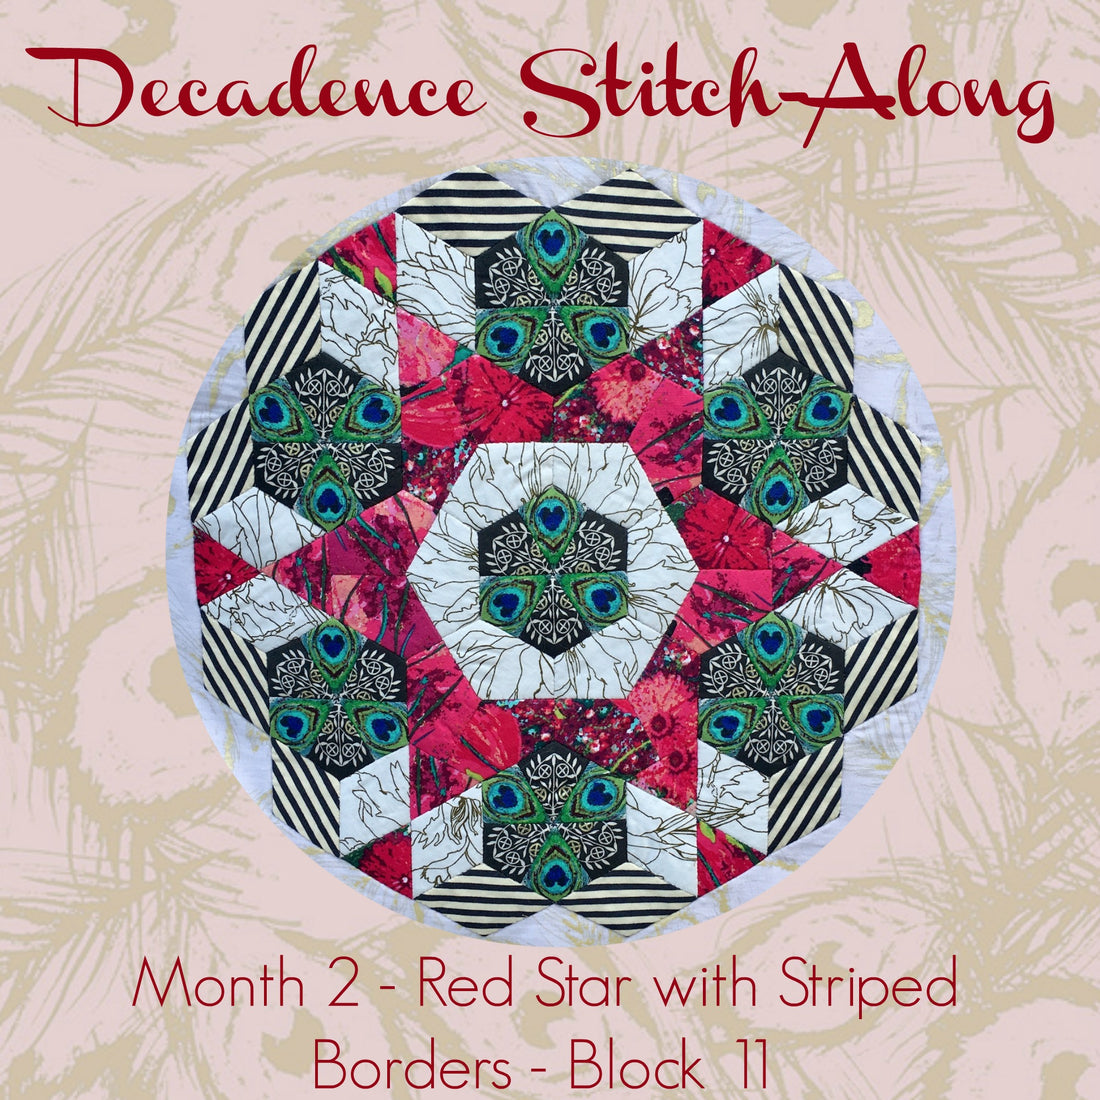
NOW, OUR APRIL, BLOCK #11 ROUND IS FINISHED. I particularly like this Round with the bold red star around the center and a bold red triangle exploding from each tip of the star. You will find that each of our twelve Rounds are completely different from each other, making this an intriguing quilt to work on. Particularly if you are a beginner, you will learn different piecing structures as we complete these Rounds. So, keep your needles busy and finish each Round every month. Don't forget to post your progress on Instagram and/or Facebook with #DecadenceSAL. You could be the winner of a monthly prize! Jen shares some really neat prizes…And, feel free to ask any questions.