Celestial Star SAL - Month 1 - Twin Peacocks

Hello and welcome to our Celestial Star Quilt Stitch-Along, an Adventure in Fussy Cutting, presented by Red Thread Studio and me, Carolyn Pytlik (@cheshire_cat_quilts on Instagram), where you can find many pictures of my work. This wonderful pattern is designed by Sharon Burgess in her new book Quilting on the Go English Paper Piecing. A special shout out to two of our overseas friends from Italy and Australia, both of whom loved the quilt enough to have their fabric packages shipped so far away. Thanks to all of you for sewing along with me.
Feel free to comment here, on Instagram or in the Celestial Star Stitch-Along Facebook group with any questions. Don't forget to share your photos of your work in progress either on Instagram or Facebook each week for a chance a monthly prize! Just use the hashtag #CelestialStarSAL.
A Little Bit About Me
I have been sewing since I was a child making clothes for my original Barbie Doll. I have learned how to sew most anything one can do with a needle and thread; garment sewing (both women's and men's), quilting, needlepoint, cross-stitch, embroidery, smocking, and more. I am retired, and although my career was not in sewing, I have, over the years, worked numerous part time jobs in the sewing field. I worked in three different fabric stores. I worked where we made custom curtains and drapes (that was an experience where I learned much valuable information). I did alterations in two bridal stores and even a long full-time stint in a men's clothing store as one of Richman Brothers 700 fussy tailors (do any of you remember that brand?). I LOVE TO SEW. I had made numerous simple hexagon quilts many years ago. I found my great love for EPP and fussy-cutting when I discovered Katja Marek's Rosette Quilt using her book The New Hexagon with 52 different hexagons. So now I'm hooked on EPP, and it is a pleasure to share with you my methods, knowledge and experience.
Stitch-Along Overview
Monthly fabric packs from Red Thread Studio have the exact fabrics I am using, "Treasures of Nature" by Jason Yenter of In the Beginning Fabrics. These fabrics lend themselves perfectly to fussy cutting, as do many of his collections. Each month, I will be sharing with you specific cutting diagrams, tips and experiences I had while creating the quilt. This picture shows you how much I have completed in four months.

There are those of you following who are using your own fabric; you will receive many tips for creating this quilt even though specific fabric directions may not be applicable to you. We are happy to have you stitch along with us! Many of you with a lot of EPP experience may apply different techniques to your EPP, which is fine. These are the methods with which I have had success. This being our first color burst/month, there will be quite a few general informational tips and directions.
Please also read my guest blog on fussy cutting. This article details my exact procedures for fussy cutting and sewing fussy cuts with pictures. It will be helpful for understanding some of the information detailed below.
Selecting Fabric For Fussy Cutting
When selecting fabric for fussy cutting, keep in mind the following:
- If you have your pattern and templates, make a fussy cutting viewer by cutting a hole in white card stock the exact final shape(s) of your paper(s). Take it with you to the store or to your stash. This viewer will show you a variety of possibilities for any fabric.
- Also take your folded mirror to see the fabric like a kaleidoscope. Remember the mirror shows reverse images.
- Look for motifs that do not have a lot of distracting "clutter" in the nearby background.
- Small overall prints and flowing designs do not create interesting images.
- Although solids give your eyes a resting place, I find them to be flat in the overall design. Tone on Tone fabrics, especially those with motifs, make much more interesting places for your eyes to rest.
- Symmetrical prints are excellent and easier to utilize. But asymmetrical prints also have interesting possibilities.
- Do not concern yourself with straight of grain, as most pieces will be cut with numerous sides on the bias.
- Count the repeats in a design. Some fabrics have as much as a 24 inch repeat on each side of the fold. With these, you may need about 2 yards for one hexagon, but you may find numerous motifs to use within the repeat. Many fabrics have multiple repeats across the width making these an economical choice. Avoid simple motifs such as one star centered on a background; there is little creativity in such cuts.
- Watch when the fabric is cut. It is often rolled on the bolt at a slight angle and one side of the fold may be different from the other, cutting through precious motifs. These come from the factory that way, so it is up to you to accommodate this into your yardage.
- Your choice of wing fabric for this pattern is crucial; it can make or break your design. Look for contrast in design and/or color to make them stand out. I have used a small stripe which has added an interesting visual to the overall design. For me, this stripe was the most crucial design element selected.
- ALWAYS buy more fabric than you think you need. Don't we all anyway?
General EPP Tips
- If you are using the same thread that I prefer, Superior Threads 60 weight Bottom Line polyester, you will find that this thread is nearly invisible in your stitching. I make very small and tight stitches (20+ per inch); you may find that less stitches per inch is comfortable for you. I mostly use a light grey or beige but often change to match when stitching through bold colored fabrics or white fabrics. You will find this thread to be "slippery". For that reason, it is necessary to tie TWO knots at the hole of the needle after threading; this will keep your thread from slipping out of the needle which would drive me crazy. It will not affect the stitch as it goes through the fabric. It is also necessary that you knot AND secure your beginning and ending stitches very well. I begin with twisting a knot between my fingers, any quilting knot will work. However after running the thread through the fabrics, take a few more stitches to secure it tightly at the beginning. The same applies to your ending knot; secure it tightly with a few extra stitches or loop knots. A loop knot is created just before you complete the stitch while there is still a loop showing, you pull the needle through the loop to finish. We will be bending and pulling on these seams a great deal when putting it together, and a simple knot may pull open. Do not use this thread for basting your papers; it is too precious and expensive for that. Instead, use old thread from your sewing box.
- Press, press, press. Notice I didn't say "iron". When pressing, you simply hold your iron to the piece and lift it away. Ironing is a back and forth motion which can distort. Press your pieces after basting and after sewing them together (always start with well ironed fabric).
- When basting or gluing the fabric to the papers, keep your fabric firmly wrapped and your corners tight.
- When adjoining pieces, especially long thin ones, make sure you have tight points joining at each tip of your shape. If your points are not tight or not joined together at the very tip of the points, you will have difficulty when joining stars together.
- When joining pieces, do not sew through seams you encounter; sew up to the seam and your next stitch will be on the other side of the seam. Your piece will lay flatter.
- I like to start my sewing at crucial matching points, whether this is at a motif in the middle of your piece or if there is an end where thin points come together.
- If your acrylic templates have a 1/4" seam, I suggest you increase that to 3/8" seam when cutting. Simply cut 1/8" beyond your tracing lines. When matching motifs, this is very important. You need that wiggle room.
- I stitch approximately 20+ stitches per inch and I am a tight stitcher. You may not need 20 stitches, but please keep your stitches close and snug.
- Keep your tools, etc., organized. I use small zipped sandwich bags to sort and hold nearly everything. I have one bag for viewers, one for templates, one for cutting tools, etc. I keep these bags in a large cosmetic case. I pay particular attention to my acrylic templates. I know that there are some small acrylic templates hiding inside my couch or in the bottom of a bag of sorted fabric; I've had to purchase these a second time.
- If you make mistakes in cutting, save these pieces for your small star bursts in months 11 and 12.
That should be enough tips for today, right? It is our first color burst, so these are lots of pointers to get you started.
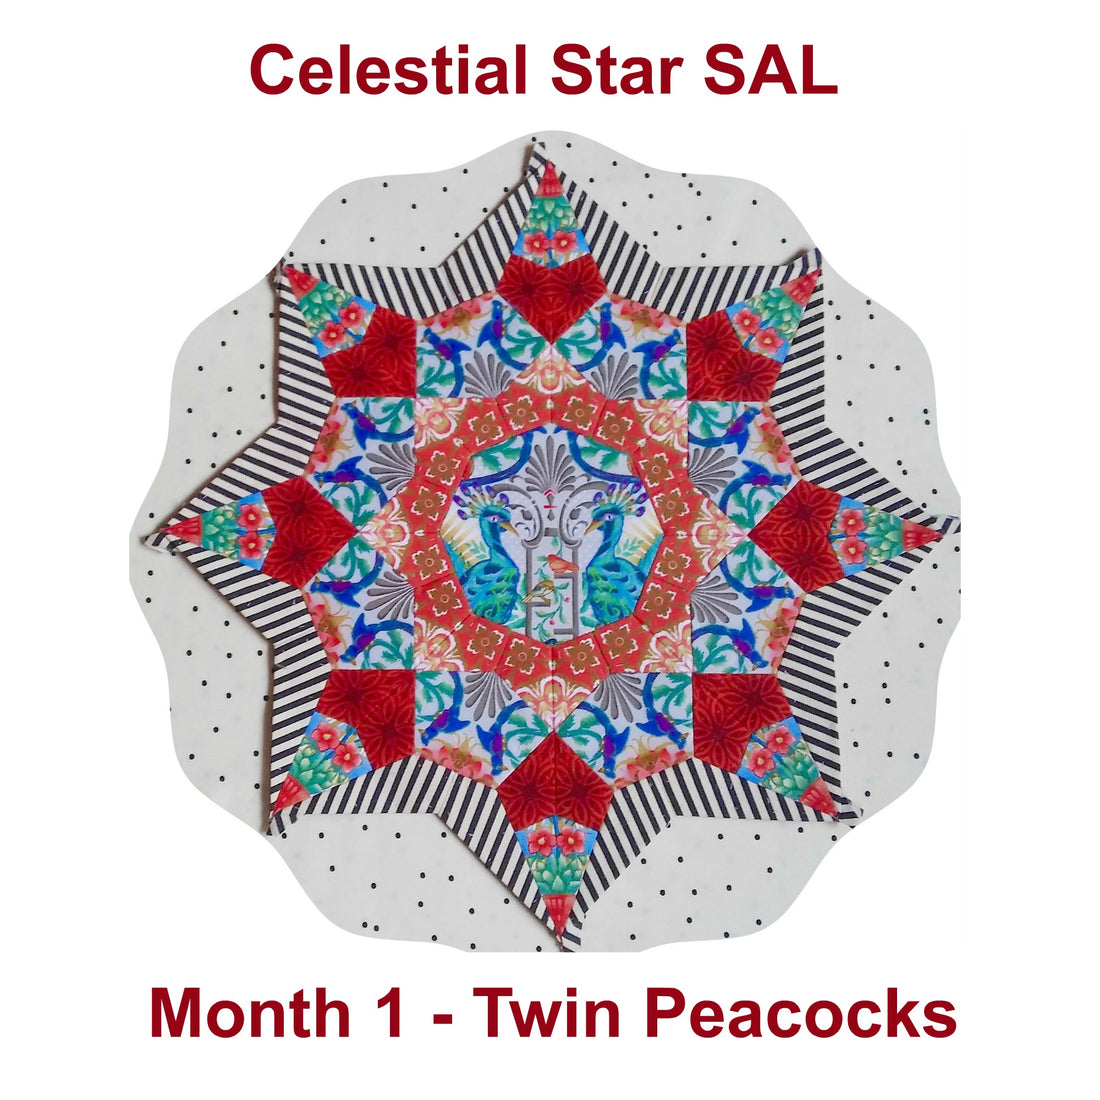
Detailed Instructions For Month 1 - Twin Peacocks

The picture shows you Color Burst #1 which we are referring to as Twin Peacocks (with birds). Obvious, isn't it?
The exact placement for cutting each motif WITH SEAM ALLOWANCE INCLUDED is outlined in the remaining pictures. Be careful when tracing and when cutting. CUT ONLY AROUND THE DESIGNATED MOTIF.
This paragraph gives you pointers on what to look for when basting the fabric to the papers. To those more experienced, these pointers may seem obvious, but to the beginner fussy cutter it may help you to know what to look for when basting. Placements have often been selected specifically for you to match design motifs, often on both sides of the piece. When basting the fabric to the papers, pay attention to the following:
(1) The twin peacocks for the large octagon are centered East/West on the fabric. Notice the grey "plume" pointing to the top; and how the small amount of the peacock's tail hits the East/West points.
IMPORTANT NOTE: CUTTING LINE HAS BEEN MARKED WITH MARKER AND FOLD LINE HAS BEEN DRAWN WITH PENCIL TO ILLUSTRATE POINT. DO NOT USE MARKER FOR CUTTING LINE AND DO NOT MARK YOUR FOLDING LINE.

(2) The orange four-pointed star has at its top point a white petal. Notice how the brown flower is centered just above the wide point. And see how both side stems with the white top are exactly the same distance from the East/West points.
IMPORTANT NOTE: CUTTING LINE HAS BEEN MARKED WITH MARKER AND FOLD LINE HAS BEEN DRAWN WITH PENCIL TO ILLUSTRATE POINT. DO NOT USE MARKER FOR CUTTING LINE AND DO NOT MARK YOUR FOLDING LINE.

(3) On the next large jewel the symmetrical design is centered East/West but notice how the grey "plume" is cut off at the bottom to allow the top orange section enough space to cover the entire top of the piece.
IMPORTANT NOTE: CUTTING LINE HAS BEEN MARKED WITH MARKER AND FOLD LINE HAS BEEN DRAWN WITH PENCIL TO ILLUSTRATE POINT. DO NOT USE MARKER FOR CUTTING LINE AND DO NOT MARK YOUR FOLDING LINE.

(4) The red tone on tone four pointed star piece, centered East/West as all the others, has that small "V" at the center point of the wide end and compare your piece to where the thin end point lands.
IMPORTANT NOTE: CUTTING LINE HAS BEEN MARKED WITH MARKER AND FOLD LINE HAS BEEN DRAWN WITH PENCIL TO ILLUSTRATE POINT. DO NOT USE MARKER FOR CUTTING LINE AND DO NOT MARK YOUR FOLDING LINE.

(5) Finally, the thin point of the jewel ends at the third row of the design on the flower pot and the flowers have about an eighth of an inch space above them before the edge.
IMPORTANT NOTE: CUTTING LINE HAS BEEN MARKED WITH MARKER AND FOLD LINE HAS BEEN DRAWN WITH PENCIL TO ILLUSTRATE POINT. DO NOT USE MARKER FOR CUTTING LINE AND DO NOT MARK YOUR FOLDING LINE.

I hope this gives you a sense of the type of things you will be looking for when attempting to create designs exactly like the original. I will not be repeating this type of instruction unless requested. I simply want to show you what to look for when basting your pieces.
There are two sections where you will need to match motifs at your seam. The first section is the circle of four-pointed stars around the center octagon. First sew them in pairs (matching motifs) along the long sides. Then sew the pairs together (matching motifs) along the short side; EXCEPT LEAVE ONE SEAM OPEN rather than closing the circle. This opening will make it easier to join this circle to the large center octagon.

When sewing the ring to the large center, start at the first seam closest to the separation and stop at the last seam closest to the separation. Then sew the opening in the ring closed before sewing it to the large center.
The second section where you must match motifs at the seam is the red pair of four-pointed stars just before the kite end points of the color burst. Matching motifs, sew the red four-pointed stars into pairs. If you have cut and basted all your sets of pieces identically, and have matched seams with your four-pointed stars, you will have completed a perfect color burst.
We will not be adding the striped wings until our fourth month. These can be a little tricky and I'd like you to master your color bursts first.
This is slow-stitching. That which I accomplished in four months meant stitching nearly every day. Stitching is what I do for fun. I hope you have fun making this quilt.
3 comments
What shops in Sydney near Gosford has the templets for this project. I have a friend visiting there and hope she can pick some up for me.
Translation of Therese’s comments: Hello, Thank you for your valuable advice …… .I will follow you carefully! We leave these days for 1 trip abroad, maybe this book will be part of my luggage …… I have to choose my fabric before leaving!
Good luck for the rest of the adventure …. and thank you again … Thérèse …. from France.
Bonjour, Merci pour vos précieux conseils…….je vais vous suivre attentivement ! Nous partons ces jours ci pour 1 voyage à l’étranger, peut-être que cet ouvrage va faire partie de mes bagages……il faut que je choisisse mon tissu avant de partir !
Bon courage pour la suite de l’aventure…. et merci encore…Thérèse…. depuis la France.